Pages

Showing posts with label Decorate. Show all posts

Thursday, April 26, 2012

Kid's bathroom art decoration

I have been so excited the last couple of days to show you this.  As a congratulations for our new home our amazing realtor gave us a gift card to Bed, Bath and Beyond.  So we got some new bath towels and a fun shower curtain for the kids bathroom.

Super cute!
I wanted to add some wall decor to the bathroom to give it a fun touch.  So I painted a duck to match one of the ducks from the shower curtain.  I went to Walmart to find a frame for my cute little duck, but decided to wait on buying one. When I got home I had a brillant idea...a puzzle frame!  The pieces from the puzzle I got a Desert Industries a while back (for $1) would be perfect for this project!


During nap time I made a wide puzzle piece picture frame.  Go here to see my tutorial on how to make a puzzle piece picture frame.
I am so excited on how it turned out!  I can't wait to add more decorations to the bathroom.


Tell me what you think, I love hearing from my readers.

Some other ways you can save money for you bathroom is buying a shower curtain at the Dollar Store. 

Monday, October 17, 2011

Halloween Ornament Wreath


We are so excited to be here on Doodles and Doilies!


Halloween decor can be scary, spooky, silly, cute, or


classic. Today we would like to show you a very classic take on both Halloween colors, and decor!


I {Bonnie} have had my eye on one of these wreaths forever!! So, last year when all the Christmas {YES...I said Christmas} ornaments went on clearance, I snatched up what I needed to make this Halloween ornament wreath!!


Here is what you will need...


1 metal macrame' ring {I got mine at Hobby Lobby}


enough christmas ornaments to fit wire ring {I used a mixture of shiny black, flat black, shiny orange, flat orange, and glittered black}


your trusty glue gun and glue


duct tape


beautiful ribbon of your choice


The first thing you will do is to cut the metal ring...be VERY careful!! {I have a band-aid to prove it!} I used a hand saw to cut through it!


Next you will need to attach the tops of the ornaments to the glass ball with a little hot glue. This decreases the chance of the glass ball "falling" off the metal attached top. Gently pull the metal top off each one and put a little bit of hot glue in the top and gently put it back together.


Now is when you get to use that fabulous creativity you have! Simply start "threading" the ornaments onto the ring. There is no right or wrong way to do this.


I did not have a pattern that I was following, I just "eyeballed" what looked good to me!


When I was almost all the way around, I left myself just enough space to tape the wire closed! I used Gorilla Tape...it is a thinner version of the traditional silver duct tape.


Really...it doesn't have to be pretty, but it does need to secure the wreath closed!!


I added a beautiful, traditional, classic black and white gingham ribbon bow....


LOVE IT!!


We hope that you visit us on our blog, Uncommon!!


Bonnie


Thursday, October 13, 2011

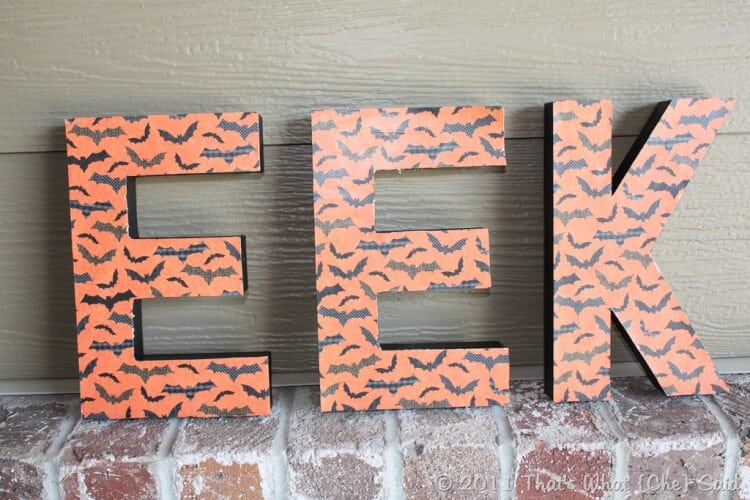
Spooky Halloween Letters

Hello Doodles & Doilies friends! My name is Cheryl and I live over at


That’s What {Che} Said…


I have a degree in Chemical Engineering, but recently decided on a career change and now I am a Work at Home Mom. I dabble in a bit of everything from crafting, to cooking, to photography, to just plain ranting! You never know what you will get when you stop by my blog! My door is always open so come by anytime!


Erica was sweet enough to have me over today to her wonderful blog to show you how you can make your own “Spooky Halloween Letters”. So let’s get to it!


IMG_9320


Decorating with words and large freestanding letters is all the rage these days, however sometimes buying them in stores can get quite pricey! We can make our own for a fraction of the cost, with a little patience and planning! Utilizing coupons and your craft store sales can pay off big!


Items Needed:


  • large letters


  • Halloween scrapbooking paper


  • modgepodge


  • paintbrush


  • exacto knife


  • paint or spray paint (not pictured)


IMG_9296


This tutorial is very flexible and can be adapted to whatever supplies you are able to find. I found these great unfinished paper mache letters that were $2.47 each marked 50% off at Hobby Lobby. You can also use wooden or foam or plastic. Which ever you choose, just be sure the front has a flat edge. I also found this great Halloween scrapbook paper and bought it by the sheet. It was $0.59/sheet also marked 50% off. I used two sheets of paper because my letters were large. If your letters are smaller you can see if they can fit on one sheet.


Next, using black spray paint, I sprayed the sides of the letters. The backs will not show and you will cover the front with paper so only the sides are important here! You can also use acrylic paint and any color that coordinates with your scrap book paper. I just love the ease of spray paint and I had a can of black on hand!


IMG_9307


Once the sides of my letters were dried, working one letter at a time I began covering the front of the letter in modgepodge. You don’t have to be pretty in doing this.


IMG_9309


Once the entire front is covered, press the glued side of the letter onto the backside of your scrapbooking paper like so. I utilized the corner and two straight edges when positioning my letter.


IMG_9310 IMG_9311


Repeat for remaining letters.


IMG_9313 IMG_9314


Let them rest/dry for about 10 minutes before starting the next step.


Using your exacto knife, carefully cut the scrapbooking paper along the edges of your letter.


IMG_9315


Next cover the entire front of the scrapbooking paper with another coat of modgepodge. Be sure to coat the edges very well so that your paper does not peel off. Modgepodge will dry clear so again you don’t have to be neat!


IMG_9317


Let dry and Wah-Lah! You have a cute little Halloween word in free standing letters for under $5!


IMG_9341


IMG_9338


If you like those little witch hats next to my letters, you can find out how I made those {here} !


Thanks again to Erica for having me!


I hope to see you all again soon! Feel free to stop over anytime, my door is always open!


And That’s What Che Said…

Thursday, October 6, 2011

Pumpkin decoration

Good morning Doodles & Doilies readers I am excited to introduce to you our first Spooktacular guest blogger...please welcome Michele from Embracing Homemaking.


I am honored and excited about writing for Doodles and Doilies. Normally I have limited space to put holiday decorations. This year I am so excited because our new house has a mantle to decorate and a neighborhood that goes all out in the yard decorations. Because we just move in a few months ago I am working on a next to nothing budget. So, I raided my scrap lumber pile (which I acquired most of from Craigslist for free) and found the perfect little box shape. It measures 5 and a half inches across the front and back, 4 inches deep on the sides and 4 inches high. I had a whole string of step by step pictures on my camera. Guess what? Can't find the cable to load them on my computer. Sooooo, I'm going to show you the finished project and still tell you what I did.


I used the pre-cut block and an inch long stick I cut with my saw. The sides of the block were already sanded so I got busy painting. Orange acrylic paint for the pumpkin and green acrylic for the stem.

Let dry and determine if you need another coat of paint. I used basic foam brushes from the dollar store by the way.

Next I free handed the pumpkin face with a pencil. You could print out the face you want and then trace through the paper to leave an imprint on the wood.

Once you have the outline, use a small artist brush to paint the face in black. Let dry completely then find a home for your new guy. I had all of these pieces on hand so it didn't cost me anything. If you bought all of the items needed then you might spend $10. The great thing is that you can make the pumpkin any size you want.

Have fun crafting!
Michele www.embracinghomemaking.blogspot.com


Thank you Michele for sharing with us this adorable pumpkin! Quick and easy!

This post is brought to you by

Wednesday, October 5, 2011

Ghost footprints

I like to make keepsakes. So when I was decorating for Halloween I put my son in the highchair, painted his feet white and stamped them onto construction paper. After they dried I drew on some "spooky" faces and some "silly" faces to turn his upside down footprints into ghosts. Then I used them for decorations and cards.


What do you think?

Friday, July 15, 2011

Juke Box Tutorial

Today we will be making a 50's party decoration: the Juke Box!
To see my 50's birthday party click here.

You will need:
Card board box
Paint
Black marker
Scissors
Gold stickers
Colored gems


Don't forget to add some "money"!

What do you think?

Thursday, June 30, 2011

Star banner tutorial

Today we will be making a Patriotic Star banner.

You will need:
red, white & blue craft paper
white yarn
hot glue
hole punch
stapler


Wednesday, June 29, 2011

4th of July ideas

Our Country is preparing to celebrate our Independence. So lets decorate and party!

To see my BBQ ideas go here
To see my 4th of July activities go here

Star Garland:
6x11 inches of red, white & blue stationary weight paper
scissors
stapler
pencil
hole punch
string

See my tutorial here
Martha Stewart's directions here

Patriotic pinwheels:
5 inch squares in two sided decorative paper
glue
scissors
map tacks
clothes pins

My decorative pinwheel tutorial here
Martha Stewart's directions here


Sand candles:
sand in red, blue, white
drinking glasses
clear vases or jars
funnel
small candles

directions here


Wind streamers:
empty oatmeal containers
blue & white craft paper
glue
double sided tape
twine/string
red & white ribbon/crepe paper
hole punch

directions here

Centerpiece cans:
clean cans
festive craft paper
double sided tape/hot glue gun

directions here

Flag party favors:
2x10 inch clear plastic bags
round blue candies
red & white candy sticks
string/ribbon

directions here

Martha Stewart gives us these great ideas and more, check them out here.
Family fun has tons of children's crafts and ideas as well, check it out here.

Wednesday, May 18, 2011

Framed picture board tutorial

My mom and I made this picture board while we visited my family. We had lots of fun and I think it turned out really well!

So, today we will be making a framed picture board so you can show off your favorite pictures!

You will need:
picture frame
batting (crib size)
coordinating fabric (amount depends on your frame), ribbon & beads
scissors
hot glue gun and glue
sewing needles
clear thread

First, you will need to lay out your fabric (the design of your fabric face down) and batting
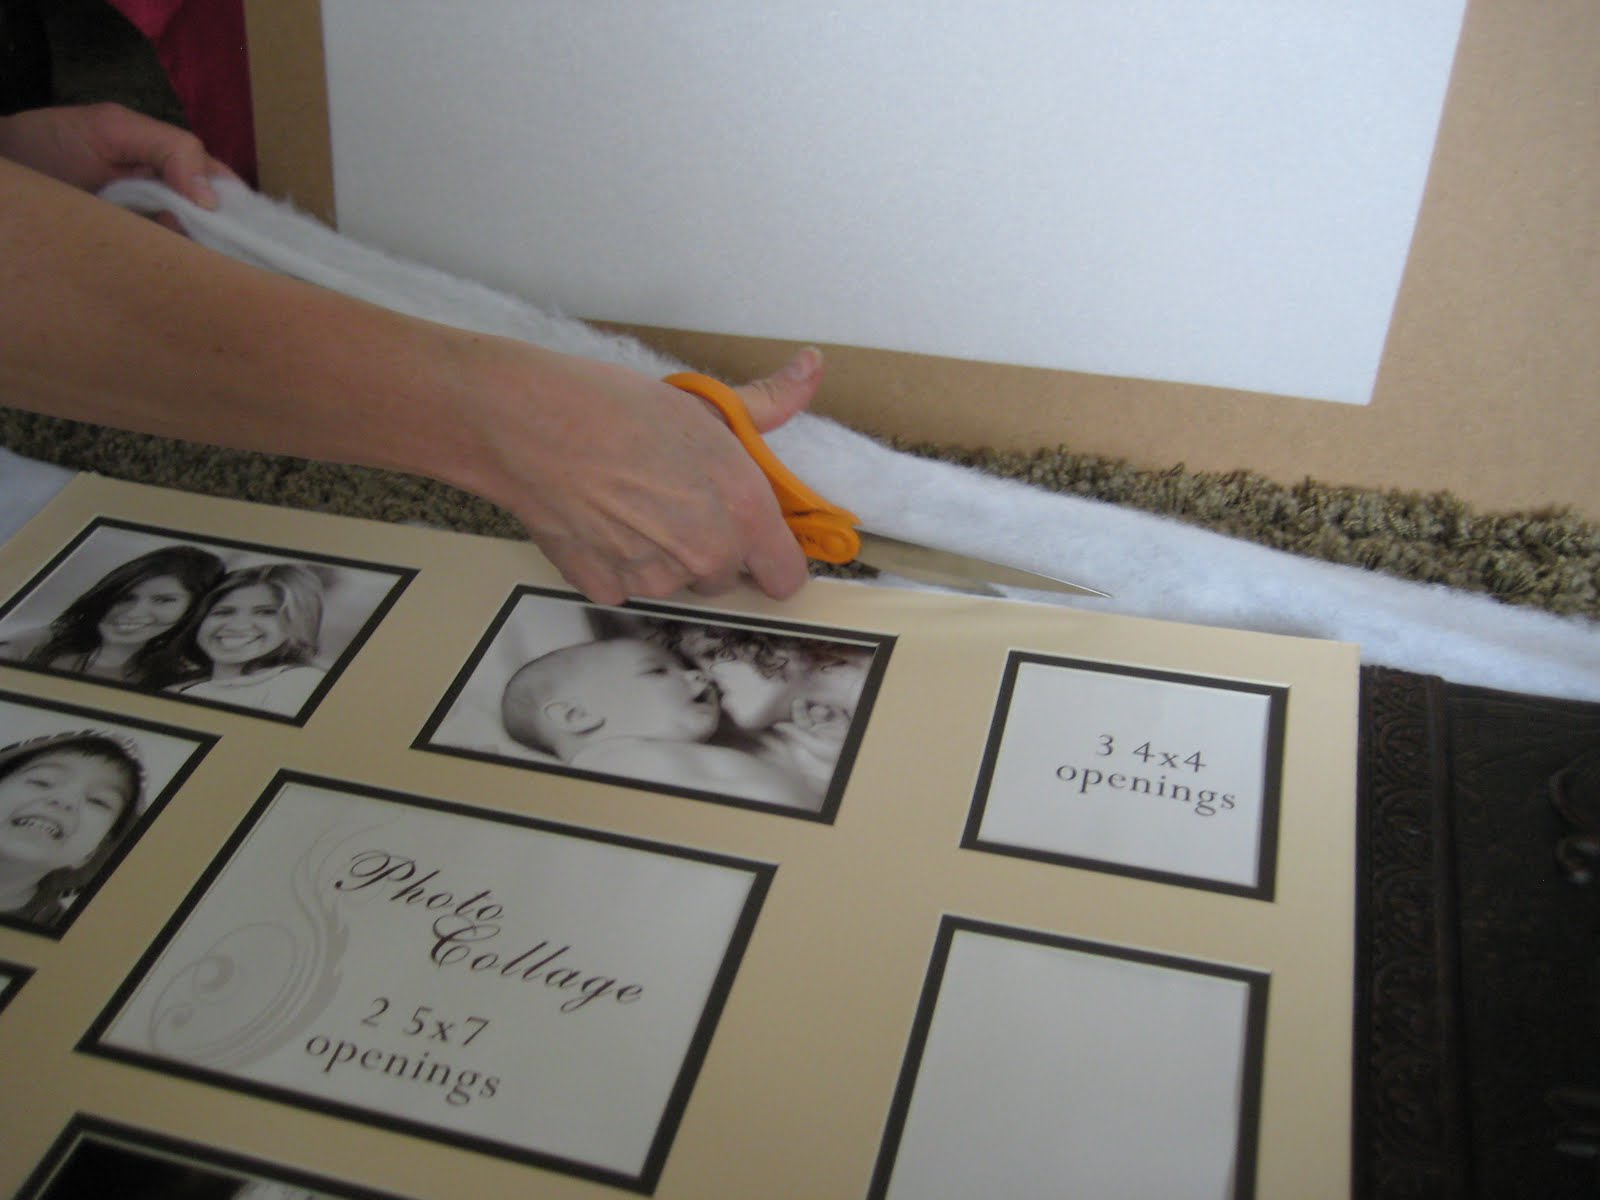
Place the mat from the picture frame on top of your batting and fabric.
Cut around the matting.
Hot glue the edge of your fabric down to the mat. Make sure that some of the batting is pinched between the mat and fabric.
Trim your fabric.
Here is the front so far:
Now we will be adding ribbon.
Hot glue the beginning of your ribbon to one of the corners.
Stretch it across diagonally to the opposite corner.
Cut your ribbon.
Repeat on your other two corners.
For the center lines:
Glue your ribbon down on the center of on of your sides.
Stretch the ribbon to the next side.
Glue.
Fold ribbon to angle it towards your next side.
Repeat until all of the sides have been done in a counter-clock wise pattern.

Here is what it should look like:
Now you need your needle(s) and clear thread.
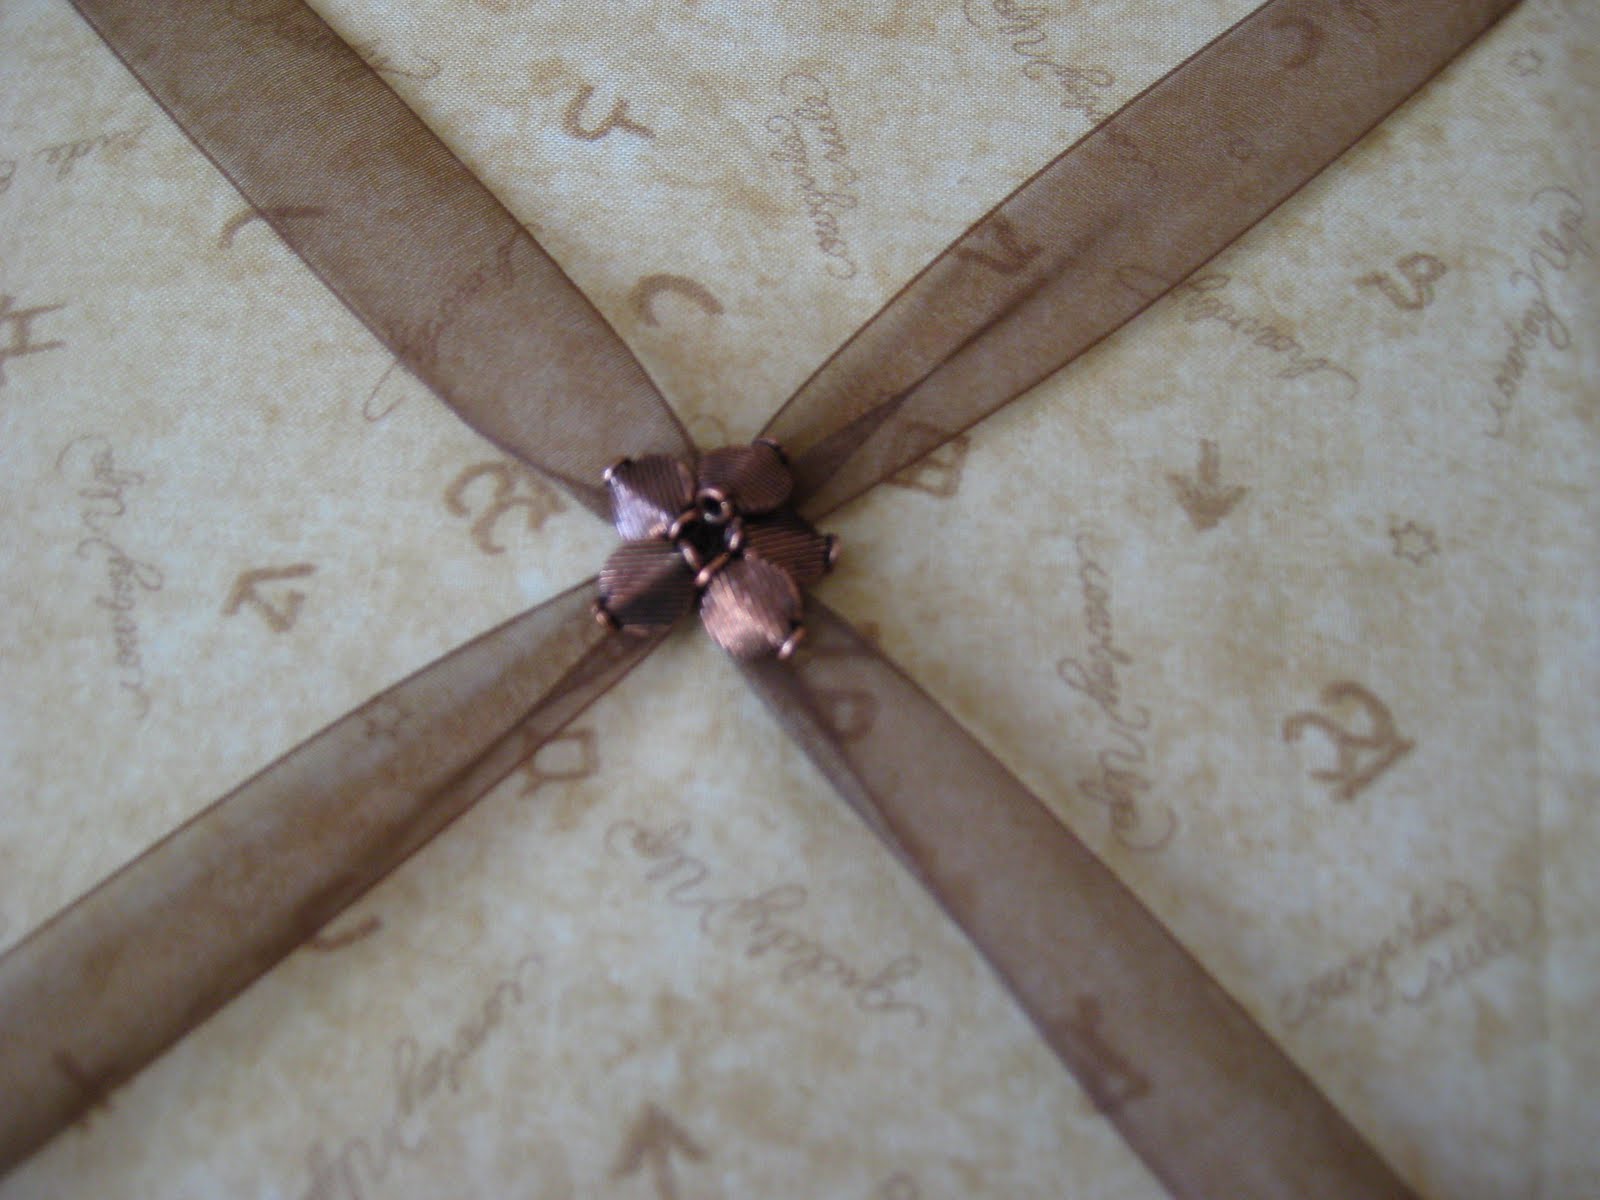
Bunch your ribbon together by tying it with the clear thread.
Add your beads.
This is how ours turned out.

Place the finished picture board into your frame.
Hang on your wall.
Add your favorite pictures.

Tell me what you think! And don't forget to send Doodles & Doilies pictures of your projects so we can show off your creativity. Email me at doodlesanddoilies (at) gmail (dot) com.

And the Doodles & Doilies - Party in May! has been extended to the end of the month. So hurry on over to order your favorite Scentsy warmers and fragrances for summer! Check out the warmer of the month: Magellan!
Related Posts Plugin for WordPress, Blogger...