Pages

Showing posts with label Paper crafts. Show all posts

Friday, May 18, 2012

A Fishing Birthday

While my mom was at work she texted and asked when my dad would be home from work and if we could do a bbq for a surprise birthday dinner.  I told her that dad was planning on making fish and baked potatoes for dinner.  My dad was with me at the time so I sorta had to fib to him about the party. Luckily he had to go to the store.  So while he was out I made his favorite cake...yellow cake with homemade chocolate frosting.  My mom wanted some decorative fish for a game.  My sisters made those while I baked.  They had a lot of fun.  As you can see they made one that looks like my dad.  We also had camo fish and a fish with braces and glasses.


After we at our fish dinner we got the party set up in the front room while my dad was watching sports down stairs.  My sister put a magnet on the end of string and threaded yarn through a fishing pole so my dad could fish for his presents.  My mom put paper clips onto the paper fish and placed one fish in each of his birthday packages.  We also had three blow up fish that we put in some of the bags.  When he got those fish my mom instructed us to say, "Wow!  You caught a big one".  


Then my sister went down to get my dad saying, "Dad, I need you to catch a fish."  He replied "Why did one die?"  We shouted surprise when he came into the room.  He was pretty excited.  And he really loved "fishing" for his presents.  His gifts were all fishing related...in prepartion for our family vacation this summer.


We had a lot of fun celebrating my dads birthday.  I wanted to share this idea with you because I thought it would also make a super fun party idea for children as well.  Let us know if you used this idea and how it went.


Friday, February 10, 2012

Paper heart chains


Valentine's Day boxes

I wanted to make some Valentine's boxes for my family to exchange Valentines (and love notes). My son colored his and I made two for my husband and I. I think they turned out pretty cute and it was really cheap.

Fun little "you have mail" tabs!


We hang our Valentine's on the wall...to help decorate.

Wednesday, October 5, 2011

Ghost footprints

I like to make keepsakes. So when I was decorating for Halloween I put my son in the highchair, painted his feet white and stamped them onto construction paper. After they dried I drew on some "spooky" faces and some "silly" faces to turn his upside down footprints into ghosts. Then I used them for decorations and cards.


What do you think?

Friday, August 19, 2011

Game Banner

So, I made this fun game pieces banner for date night. The nice thing is you can use it for multiple dates or a party!

You will need:
construction paper
hot glue gun
yarn
cutting machine or stencil

First I designed game pieces on my Silhouette.
Then I cut them out.

I hot glued them onto some yarn to make it a banner.

On the backs of the game pieces I wrote different games. For date night you pick a game piece, turn it over and play the game written on the back.

So what do you think?

Wednesday, August 10, 2011

Family goal chart

Today we will be making a family goal chart.

You will need:
Cute paper
Computer
Printer
Picture frame with glass
Dry erase markers


As I have been adjusting to my new life as a mom, I realized I needed some reminders to get things done. So I made my family a goal chart. I used fonts from Lettering Delights and created a chart with the goals for each member of the family as well as a family goal list. We even have a reward system. If the entire family accomplishes 75% of their goals for 3 weeks then we get to go to the zoo! I am hoping that my little boy will love the zoo. He has loved the animals in the neighborhood.


Growing Up Gardner

Thursday, July 14, 2011

My new store!


Well, my sister was going to be my guest blogger today. But she is in Utah on Trek with her stake. I am jealous. I never got to go on trek when I was in young womens. So I hope she has a great experience. Hopefully she will be able to be my guest blogger next week.


I started a store on Teachers Pay Teachers. You should go check it out. It isn't anything fancy...I don't want to break copyrights so I am just playing around with designing my own pictures/stuff. If you like what you see let me know and I might just be willing to give it a way for FREE! Yup that is what I said...FREE. So let your other teacher friends and mommas know about it.

Click the HERE to visit my site!

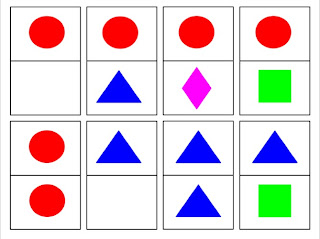
Here is a sample of my Shape Dominoes: perfect for math centers or to use at home.

Wednesday, July 13, 2011

Cards

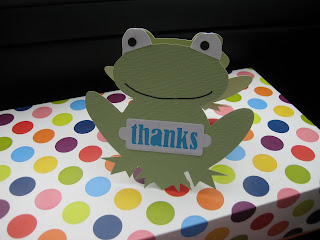
My sweet husband and his family surprised me for my birthday this year and got me a Silhouette! I was and still am super excited! I have loved playing around with it. It is amazing! And of course I had to make everyone thank you cards with my new toy. So here they are. Tell me what you think.

My favorite: the frog
A popsicle
An ice cream cone
Tied with tulle
My other favorite: bubbles! This one was for my nieces 3rd birthday.
A flower

Thursday, June 30, 2011

Patriotic pinwheel tutorial

Today we will be making decorative pinwheels for the 4th of July.


You will need:
decorative paper (preferably double sided)
hot glue
iRock gems (or other centerpieces like buttons)
craft sticks (or popsicle sticks, clothes pins, wooden dowel)


Star banner tutorial

Today we will be making a Patriotic Star banner.

You will need:
red, white & blue craft paper
white yarn
hot glue
hole punch
stapler


Wednesday, June 29, 2011

4th of July ideas

Our Country is preparing to celebrate our Independence. So lets decorate and party!

To see my BBQ ideas go here
To see my 4th of July activities go here

Star Garland:
6x11 inches of red, white & blue stationary weight paper
scissors
stapler
pencil
hole punch
string

See my tutorial here
Martha Stewart's directions here

Patriotic pinwheels:
5 inch squares in two sided decorative paper
glue
scissors
map tacks
clothes pins

My decorative pinwheel tutorial here
Martha Stewart's directions here


Sand candles:
sand in red, blue, white
drinking glasses
clear vases or jars
funnel
small candles

directions here


Wind streamers:
empty oatmeal containers
blue & white craft paper
glue
double sided tape
twine/string
red & white ribbon/crepe paper
hole punch

directions here

Centerpiece cans:
clean cans
festive craft paper
double sided tape/hot glue gun

directions here

Flag party favors:
2x10 inch clear plastic bags
round blue candies
red & white candy sticks
string/ribbon

directions here

Martha Stewart gives us these great ideas and more, check them out here.
Family fun has tons of children's crafts and ideas as well, check it out here.

Friday, June 24, 2011

Art

Stock your art cupboard with:
acorns, ads from the store, aluminum foil, art smocks (old t-shirts work great), pie plates (different sizes), beads (different size, shape and color), bottle caps, boxes (different sizes), brown paper bags, butcher paper, buttons, candles, cardboard, different colors of card stock paper, catalogs, cereal boxes (cracker boxes, noodle boxes, etc.), chalk, clear tape, clothespins, coffee cans with lids, coins, colored pencils, confetti, a variety of colored construction paper, corks, cotton balls, cotton batting, cotton swabs (regular & infant kind), craft sticks, crayons (different sizes for different ages), crepe paper, curling ribbon, duct tape, dried beans, dried pasta (different shapes, sizes, colors), egg cartons, cleaned egg shells, empty jars and lids, envelopes (different sizes), fabric scraps, felt, finger paint, sheets of foam, foam pieces/stickers, gel pens, used greeting cards, glitter, glue/glue sticks, googly eyes, hole punch/three hole punch, different color ink pads, junk mail, lids from plastic gallon jugs/gallon jugs, magazines, magnets (warning: a serious chocking hazard), marbles used for marble painting or stamps(different sizes), markers, masking tape, metal lids from frozen juice cans, newspapers, old clothes, old mittens/socks/mittens for puppets, old telephone books, old toothbrushes, paint, paint brushes, paint sample booklets, paper clips, paper fasteners, paper muffin cup liners, paper plates/cups/bowls, paper scraps, paper towel rolls (not toilet paper rolls...gross), permeant markers, photographs of friends and family, pine cones (different sizes), plastic bowls/lids/bottles, packing peanuts, pencil sharpener, pencils, pens, pipe cleaner, playing cards, popcorn, popsicle sticks, ribbon, uncooked rice, rocks (used for decorating or stamps), rubber bands (different sizes and colors), rulers, sand (used like glitter), sandpaper, child safe scissors (as well as a pair for you), self-adhesive paper, plastic sheet protectors, sponges, spray bottles, stapler, stamps, stencils, stickers, straws (different sizes, width, color), string, tempera paint, thread, thread spools, tissue paper, toothpicks, plastic trays (kind used in the cafeteria), wood scraps, wrapping paper scraps, water color paint, writing pads, yarn
(many of these ideas were taken from The Preschooler's Busy Book and others are my own)


I feel that it is important to provide children with creative materials and let them use their imagination to create! To preserve their creations: take pictures/post them on the refrigerator/frame them/scrapbook them/display them on a shelf.

Please remember that the items here are for all different ages. Please choose items that are age appropriate for your child and supervise art time to prevent chocking and other harmful accidents.

Tuesday, June 21, 2011

Turtles & Tortoises

DISCUSS & LEARN:
*Differences in a turtle and a tortoise.
*What do turtles and tortoises eat?
*Where do turtles and tortoises live?
*How old can turtles and tortoises get?

ACTIVITIES:
*Act out the tortoise and the hare. Make ears and a shell.

*Play-dough turtles: have large laminated pictures of the ocean, lake, and desert for habitat place-mats. The children can make turtles with the play-dough.


MAKE:
*Baby Turtle Story: find pictures to match this story that I made and make it into a binder story...
"There was an egg in the sand of a beautiful beach. When the egg hatched, out came a baby turtle.
"Then all of the little baby turtles waddled out to sea.
"But! On their way to the water, big birds and crabs attacked the baby turtles, because the birds and crabs were hungry.
"Most of the baby turtles were able to make it safely to the ocean. (sigh of relief)
"Once the baby turtles got into the water they swam away from the birds and crabs.
"The swam around the water looking for small fish, shrimp and crabs to eat, because they are carnivores."

*Paper bowl turtle: paint a paper bowl green. If you want draw lines on the shell or glue on buttons. Add a head, goggly eyes, legs and a tail. You can use pipe cleaner, popsicle sticks, etc.

*Flower pot turtle: paint a small/cheap flower pot and 5 small rocks (head and legs) green. Decorate how you would like: use paint, glitter, markers, pom-poms, buttons, crayons, construction paper, foam pieces, stickers, ribbon, etc. Go here to get more ideas/instructions.

*Turtle maracas: fill one paper/plastic plate with beans or rice. Glue another plate on top with hot glue (rims of plates will be glued together). Add construction paper shapes (head, legs, tail & circles for the shells) to the maraca.


BOOKS:

Franklin books by Paulette Bourgeois
Yertle the Turtle by Dr. Seuss
One Tiny Turtle: Read and Wonder by Nicole Davies
Turtle Splash!: Countdown by the Pond by Cathryn Falwell
The Tortoise and the Hare by Betty Miles
How the Turtle Got Its Shell by Justine and Ron Fontes
Tortoise Brings the Mail by Dee Lillegard

SONGS:
TINY TIM
I Have a tiny turtle, his Name is Tiny Tim.
I put him in the bathtub, to see if he could swim.
He drank up all the water.
He ate up all the soap.
Then my little turtle got a bubble in his throat.
Bubble, bubble, bubble
Bubble, bubble, BURP

LITTLE TURTLE
There was a little turtle (make a small circle with your hands)
He lived in a box, (make a box with both hands)
He swam in a puddle, (wiggle hands)
He climbed on the rocks. (climb fingers of one hand up over the other)
He snapped at a mosquito, (clap hands)
He snapped at a flea, (clap hands)
He snapped at a minnow, (clap hands)
He snapped at me. (point to yourself)
He caught the mosquito, (mimic catching a bug)
He caught the flea (same action)
He caught the minnow, (same action)
But he didn't catch me! (point to yourself)


I AM A TURTLE
(by me: Erica)
I am a turtle; I live by the sea
I eat meat don't you see
They call me a herbivore
Yes sir e
I am a carnivore in the sea

I am a turtle; I live in a lake
I eat plants for goodness sake.
They call me a herbivore
Cause i don't eat cake
I am a herbivore in the lake

I am a turtle; I live in the desert
I eat plants and meat from the land
They call me an omnivore
That's where I stand
I am an omnivore in the desert sand

RECIPES:
*Turtle Shells: you will need half a green apple, a large green grape, peanut butter, raisins and other foods to make your turtle. Make a head, eyes, legs and a tail.

Friday, June 17, 2011

Father's Day banner

I hope you didn't think that I forgot Father's Day...today we will be making a quick and easy Father's Day banner. It will add a fun and festive touch to a Father's Day party or just to let Dad know you are thinking of him on his special day!
So lets get started!
You will need:
12x12 pieces of paper (plain or decorative)
White card stock
scissors
glue
brads
pop dots

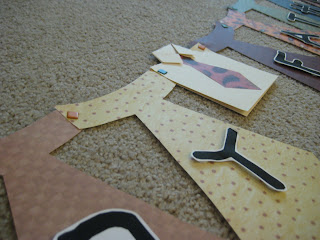
I folded my 12x12 paper half and cut out two ties from each piece of paper.
I printed out some letters at Lettering Delights...you should check them out they are amazing!
Then, I cut out my letter. I believe Lettering Delights can connect to your Cricut and Silhoutte.
Put pop dots on the back of your letters and place them on your ties.

I just learned this great idea from my mother-in-law...
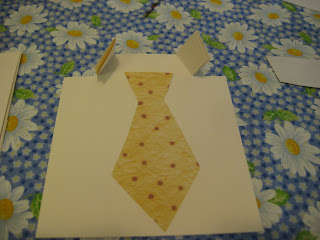
Take a cream or white or whatever color paper you want to make a shirt. I used a two cream colored 12x12 pieces of paper. Fold your paper in half. Mark every 5 inches. Cut. You should have a card (two for each sheet of paper).
On the crease of the card mark 1 1/2 inches from both ends. This will be your folding line for the collar. Now mark one inch down on from the crease on both sides. Cut on this line 3/4 of the way towards your 1 1/2 inch mark.
Fold the flap inwards creating a collar.
Cut out 4 smaller ties to go on the shirts. Glue the "knot" of the tie down.
Glue the collar down.
This is my husbands first father's day. So I put our sons foot prints in one card, traced his hand prints in two cards and let him color in the fourth card.
Put your banner together with the brads.
Hang it up on the wall!


You can do lots of different banners as well. I chose an outdoor banner because my husband likes the outdoors. You can chose a theme for your banner based on what your husband/dad loves to do. Some examples are:

Golf
Fishing
Hunting
Cars
Motorcycles
Biking
Sports
Gardening
Reading

You can make your ties with paper that matches your theme or don't do ties at all...do shapes that match your theme. Some shape examples would be:

Golf: golf ball, golf cart, golf pants, hat, clubs, etc.
Fishing: pole, lures, tackle box, bait, fish, etc.
Hunting: rifle, targets, animals (bird, deer, elk, moose), etc.


Have fun and be creative!!!
Send a picture of your finished banner to doodlesanddoilies(at)gmail(dot)com and I will post them to share with all of the other Doodles & Doilies readers!


Don't forget to make your wheel of affection for dad...go to my tutorial here.
Related Posts Plugin for WordPress, Blogger...