Pages

Thursday, October 13, 2011

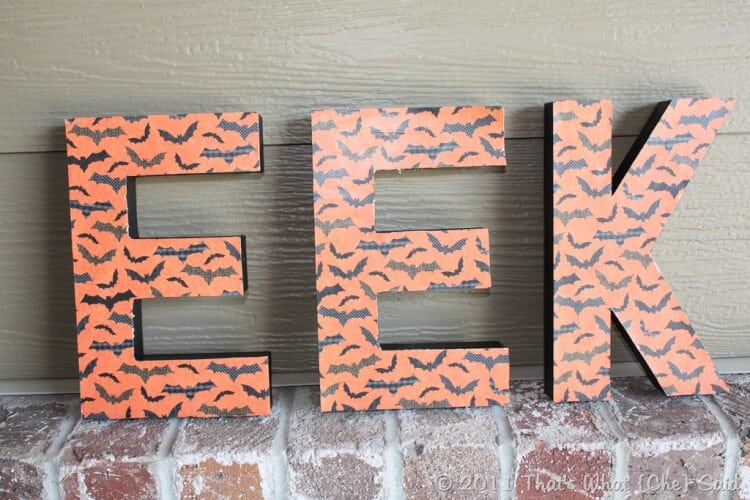
Spooky Halloween Letters

Hello Doodles & Doilies friends! My name is Cheryl and I live over at


That’s What {Che} Said…


I have a degree in Chemical Engineering, but recently decided on a career change and now I am a Work at Home Mom. I dabble in a bit of everything from crafting, to cooking, to photography, to just plain ranting! You never know what you will get when you stop by my blog! My door is always open so come by anytime!


Erica was sweet enough to have me over today to her wonderful blog to show you how you can make your own “Spooky Halloween Letters”. So let’s get to it!

IMG_9320


Decorating with words and large freestanding letters is all the rage these days, however sometimes buying them in stores can get quite pricey! We can make our own for a fraction of the cost, with a little patience and planning! Utilizing coupons and your craft store sales can pay off big!


Items Needed:


  • large letters


  • Halloween scrapbooking paper


  • modgepodge


  • paintbrush


  • exacto knife


  • paint or spray paint (not pictured)


IMG_9296


This tutorial is very flexible and can be adapted to whatever supplies you are able to find. I found these great unfinished paper mache letters that were $2.47 each marked 50% off at Hobby Lobby. You can also use wooden or foam or plastic. Which ever you choose, just be sure the front has a flat edge. I also found this great Halloween scrapbook paper and bought it by the sheet. It was $0.59/sheet also marked 50% off. I used two sheets of paper because my letters were large. If your letters are smaller you can see if they can fit on one sheet.


Next, using black spray paint, I sprayed the sides of the letters. The backs will not show and you will cover the front with paper so only the sides are important here! You can also use acrylic paint and any color that coordinates with your scrap book paper. I just love the ease of spray paint and I had a can of black on hand!


IMG_9307


Once the sides of my letters were dried, working one letter at a time I began covering the front of the letter in modgepodge. You don’t have to be pretty in doing this.


IMG_9309


Once the entire front is covered, press the glued side of the letter onto the backside of your scrapbooking paper like so. I utilized the corner and two straight edges when positioning my letter.


IMG_9310 IMG_9311


Repeat for remaining letters.


IMG_9313 IMG_9314


Let them rest/dry for about 10 minutes before starting the next step.


Using your exacto knife, carefully cut the scrapbooking paper along the edges of your letter.


IMG_9315


Next cover the entire front of the scrapbooking paper with another coat of modgepodge. Be sure to coat the edges very well so that your paper does not peel off. Modgepodge will dry clear so again you don’t have to be neat!


IMG_9317


Let dry and Wah-Lah! You have a cute little Halloween word in free standing letters for under $5!


IMG_9341


IMG_9338


If you like those little witch hats next to my letters, you can find out how I made those {here} !


Thanks again to Erica for having me!


I hope to see you all again soon! Feel free to stop over anytime, my door is always open!


And That’s What Che Said…

Wednesday, October 12, 2011

Candy Corn Cream Cups


I am so excited to be posting over here on Doodles and Doilies.

I am Amanda Joy and I run the blog Joy in the Jumble.

I love my family, baking, crafting, photography, and my shop Bossy Sprockets


Halloween is my favorite time of year.

It was a blast to try out a new treat, that I can now share with you:)

These little dessert cups are the perfect size for the quick, sweet fix.

The layering of flavors blend well together and help in making it so that it isn't overly sweet.


Ingredients


Yellow Layer

1 3oz package Instant Vanilla Pudding

2 cups Milk


Orange Layer

1 cup Heavy Whipping Cream

1 1/2 cups Candy Corn


White Layer

1 cup Heavy Whipping Cream

1/2 cup Powdered Sugar

Coordinating Sprinkles

1 Candy Corn for each cup


Directions


Yellow Layer
Mix milk and pudding together in a bowl according to package directions, and let it start to firm up slightly.


Place 2 Tablespoons of the pudding in the bottom of the dessert cup.


Orange Layer

Make the first part of the orange layer the night before or at least 4 hours before.


On medium heat, pour the whipping cream in a saucepan and stir constantly to prevent scorching. Once the whipping cream is heated, pour in the candy corn, again stirring constantly until the candy has disintegrated and turned the cream a pumpkin orange.


Remove from burner, bring to room temperature, then place in the refirgerator for 4 hours or overnight.


Once the orange layer is fully chilled, place it in a mixing bowl and whip until soft peaks form.


Place 2-3 Tablespoons on top of the yellow layer


White Layer
Pour whipping cream into a new mixing bowl and whip until soft peaks form. Add the powdered sugar, and whip on high speed until desired consistency is achieved. Be careful not to overwhip, as it will begin to break down.


Scoop a dollop or use an open star frosting tip in a pastry bag.


Sprinkle with desired toppings.


The orange layer is super sweet, just it is tempered nicely by the vanilla pudding and whipped topping in each bite.


This rich dessert is the perfect portion size, to not go into a sugar coma:)


Tuesday, October 11, 2011

Spooktacular Delight Me Party

It is time for another Spooktacular Delight Me party!


But first let's be inspired by last weeks most visited links.

Joy*us Designs made this adorable Halloween dress for her daughter.

She also made these fun Frankenstein goody bags for the kiddos who came to their Halloween party.


Now on to the party!!


Monday, October 10, 2011

Frankenstein Rice Crispy Treats

Good morning once again! We are starting our second week of Spooktacular. I hope you are excited to see all of the great things this week.


I am excited to show off another one of Johanna's (from Every Day Should Pop!) cake pops! She made some Frankenstein rice krispy pops. Take a look at how cute and scary she made her Frankensteins look.
So, what do you think? Adorable! Want to check out her post, click here.

If you are making cake pops or rice krispy pops for your Halloween parties send pictures to doodlesanddoilies(at)gmail(com). I would love to show everyone what you come up with.

Friday, October 7, 2011

Halloween Wand tutorial

Good Morning again to all of my readers. Today, Melanie from Bear Rabbit Bear is going to show us how to make a super cute Halloween wand.


Hi, Doodles and Doilies readers! Thanks to Erica for having me over today. First, let me introduce myself. I blog over at bear rabbit bear craft and DIY blog. If you've never had a chance to pop over, I hope you'll come check it out! In addition to fun posts and segments, I also have a weekly Things I've Done Thursday link party that runs Thursday through Saturday. We are also celebrating Fall this week with Fall Project Week. Feel free to stop by and check out all the cretive fall projects. But enough about that...let's delve into today's project!

I have absolutely so much going on, I'm finishing up my daughter's Halloween costume now. She's going as a Super-Really-Sweet-But-Smart Witch (think Hermoine), so she has to have a glittery wand! No owl feathers here, though- just lots of tulle and ribbon!

I love projects that are customizable for you and your needs, and this one totally is. Need a wand for a fairy? How about a princess? Or a Harry Potter Wanna-Be? Just change up the color scheme and embellishments and you've got it! It also takes advantage of using that craft stache- most of the materials can be found in your current craft supply.


Supplies Needed:


  • A dowel rod


  • Plastic Christmas ball ornament


  • Hot glue and glue gun


  • Ribbon


  • Tulle


  • Sand paper


Step One:

Take the hook portion off of the ornament so that you are left with only the Christmas ball portion.
Take your piece of sandpaper and sand down one end of the dowel rod. Sand it down small enough to fit inside the Christmas ornament. I sanded mine down so that at least 1/2 inch would fit snugly inside the ornament.


Step Two:

Glob the sanded end of the dowel rod with hot glue. Insert it into the Christmas ornament. Hold it for a few seconds.


Step Three:

Wrap the dowel rod with ribbon. Secure it at both ends with hot glue.


Step Four:

Use various tulle and ribbon lengths to tie around the base of the ornament. Use hot glue under the ribbon/tulle to hold in place.


Easy, quick, and uses products that I already had around the house! Doesn't get much better than that!


Thank you Melanie for showing us how to make this fun Halloween wand!

Thursday, October 6, 2011

Pumpkin decoration

Good morning Doodles & Doilies readers I am excited to introduce to you our first Spooktacular guest blogger...please welcome Michele from Embracing Homemaking.


I am honored and excited about writing for Doodles and Doilies. Normally I have limited space to put holiday decorations. This year I am so excited because our new house has a mantle to decorate and a neighborhood that goes all out in the yard decorations. Because we just move in a few months ago I am working on a next to nothing budget. So, I raided my scrap lumber pile (which I acquired most of from Craigslist for free) and found the perfect little box shape. It measures 5 and a half inches across the front and back, 4 inches deep on the sides and 4 inches high. I had a whole string of step by step pictures on my camera. Guess what? Can't find the cable to load them on my computer. Sooooo, I'm going to show you the finished project and still tell you what I did.


I used the pre-cut block and an inch long stick I cut with my saw. The sides of the block were already sanded so I got busy painting. Orange acrylic paint for the pumpkin and green acrylic for the stem.

Let dry and determine if you need another coat of paint. I used basic foam brushes from the dollar store by the way.

Next I free handed the pumpkin face with a pencil. You could print out the face you want and then trace through the paper to leave an imprint on the wood.

Once you have the outline, use a small artist brush to paint the face in black. Let dry completely then find a home for your new guy. I had all of these pieces on hand so it didn't cost me anything. If you bought all of the items needed then you might spend $10. The great thing is that you can make the pumpkin any size you want.

Have fun crafting!
Michele www.embracinghomemaking.blogspot.com


Thank you Michele for sharing with us this adorable pumpkin! Quick and easy!

This post is brought to you by

Wednesday, October 5, 2011

Ghost footprints

I like to make keepsakes. So when I was decorating for Halloween I put my son in the highchair, painted his feet white and stamped them onto construction paper. After they dried I drew on some "spooky" faces and some "silly" faces to turn his upside down footprints into ghosts. Then I used them for decorations and cards.


What do you think?

Tuesday, October 4, 2011

Spooktacular Delight Me Party

It is time again for a Delight Me Party! And a fun twist... a Spooktacular Delight Me party!


First let's take a look at last weeks most visited link.


Melanie at Bear Rabbit Bear shared this cute idea for a yo yo onesie! Go check it out if you haven't had a chance already.


And now on to our Party!


Monday, October 3, 2011

Spooky Cake Pops!

I am so excited! I hope you all know why...it is finally October, witch means it is time for Spooktacular to start! So grab a button and let the fun begin!


I am excited to introduce you to the talented Johanna from Every Day Should Pop! Johanna is from Washington. She is married and has 3 children (and 2 dogs). She works part time and loves to bake and decorate. She love to celebrate holidays; which was her inspiration for her blog, Every Day Should Pop! Johanna has challenged herself to create a cake pop for every day of the year. Each day is nationally recognized for something and she enjoys the celebration!


Let's take a look at some of Johanna's amazing (and I mean amazing) Halloween cake pops!


My personal favorite...Candy Corn Cake Pops!


Witch Hat Cake Pops!
Spider Cake Pops...another favorite!

Monster Pops: Vampires, Mummys, Zombies, Witches, oh my!


To create your very own Halloween cake pops go here to see Johanna's tutorials.


This feature is brought to you by

Tuesday, September 27, 2011

Delight Me Link Up Party!

Welcome to the 7th Delight Me party!

There were so many great link up last week and so many visits; thank you! So let's check out the most visit links from last weeks party.

Bear Rabbit Bear shared this fun DIY Minnie Mouse party. Go check it out to see more decorations and party games.

Celeste at Here in the Waiting Place gave us so many different felt/fabric flower tutorials. You have to go check them out.

Now on to the party!

Thanks for stopping by and linking up! Come back next week to see who was visited the most! Have fun!


Please:
*Link back
*Grab a button
*Become a follower
*Visit other party goers


Related Posts Plugin for WordPress, Blogger...