Pages

Tuesday, May 31, 2011

Children's Month...making summer fun!

I am so excited to introduce you to Children's Month at Doodles & Doilies. During the month of June I will be giving you great ideas to help you entertain your children this summer! Now I have a lot of great ideas, but I would love our input! So email me at doodlesanddoilies(at)gmail(dot)com with your ideas, instructions and pictures. Together we will be recommending songs, books, activities, science projects, recipes and so much more.

So lets get started!

Here are some of the topics:
Farm animals: chickens, cows, ducks, geese, goats, horses, pigs, sheep
Road trip activities

The possibilities are endless. Let's make this a terrific summer to play and teach our children!


DONT FORGET today is the LAST day for the FABULOUS FRIENDS SCENTSY PARTY! Go get your FREE SCENTSY BARS here!

Feeding the ducks

Today's date idea is feeding the ducks! Pack a picnic, a game, some bread and head to the nearest park. Enjoy spending time together!


Send us pictures of your date nights! And keep adding to your date night jar.

Here are a couple of pictures my husband and I took when we went for a sunrise walk along one of the beaches in Hawaii!

Friday, May 27, 2011

50's birthday banner tutorial

Hooray! The weekend is almost here. I am so excited to spend some time with my family. What are you doing for Memorial weekend?

Today I will be showing you how I made the birthday banner for my parent's 50th birthday party. If you want to see how the party turned out go here.


You will need:
black paper
colored paper to match your theme (we did pink & teal)
color coordinating curling ribbon
wooden music notes
black paint
scissors
hole punch
hot glue gun & glue stick

I went with construction paper, because I got a lot more of it for a lot less money.
Cut out your "records" in black paper. I made mine about 4 inches in diameter.
Cut out your inner circles for your "records". I made mine about 2 inches.
Glue the smaller circles onto your black circle.
Cut out the letters you will need for your banner.
Glue them on.
Punch 2 holes into the top of your "records".
Weave your curling ribbon through.
Curl the ends of the ribbon.
Paint your wooden music notes.
Hot glue them onto your curling ribbon.
All done!

What do you think?
I think a birthday banner that goes with the theme brightens up the party!


DONT FORGET that Sandee's Fabulous Friends Scentsy Party ends on Monday! So gather your friends and earn FREE SCENTSY BARS. Go here to check it out.

Thursday, May 26, 2011

Make-up basics

This is yet some more wonderful advice from my Building Zion Relief Society activity.

"MAKE-UP BASICS - The Streamlined Makeup Kit- summarized from realsimple.com
Streamline your overstuffed makeup bag & stick to these basics. A few brushes will help. But in some cases a cotton swab (or a finger) will do.
*Mascara - No matter your hair color, use black mascara. It will define your eyes and make you appear awake.
* Foundation - A full face of foundation can feel heavy, so touch up only those areas where your skin tone is uneven.
*Concealer - Choose a concealer that give medium to full coverage in a shade that's close to your skin tone.
* Blush - To choose the right color for a subtle look, find a shade that's similar to the inside of your lip.
* Eye Shadow - A neutral shade acts as a base and will instantly brighten eyes. Use one with a bit of sparkle for more festive look.
* Lipstick - Try a moisture-rick formula so your lips don't dry out. (The inner-lip trick for choosing blush works for lipstick shades, too.)"


Here is a website I found on how to apply eyeshadow & picking colors.

What are your make-up tips? Share with us!

Wednesday, May 25, 2011

Nature scavenger hunt

Today I thought I would share with you a family tradition. Every Memorial Day weekend we would go to Stanley, Id. On Sunday, my mom would put together a nature scavenger hunt for all of the children. We would get into groups (that way the younger ones could participate). The first group back would win a prize. We always had a lot of fun.

Here is a sample list of things we had to find:
pine cone
yellow flower
purple flower
5 white rock
pink rock
pine needle
2 different green leaves
wood from a fallen tree for the fire
moss
ant
worm
grass
feather
acorn
hiking stick
10 pieces of trash (throw them away)

If you live or visit the sea you could include:
sand
seashells
seaweed
driftwood

If you are in your yard:
10 weeds (free gardening for you!)
berries

For things that are hard to bring back or pick up have them take pictures of or draw:
an animals home
black bird
squirrel
small tree
tall tree
2 different animal tracks
stream/creek
meadow
pond
butterfly

If you have younger children who can't read yet or are learning; make your list a picture list. That way they can participate too!

You are the parent let them have fun, but keep them safe. You know what is around your area, so pick items that will keep them at a safe distance for you. Give them boundaries if needs be.

Monday, May 23, 2011

Fabulous Friends Scentsy Party!

Our fabulous Scentsy Consultant Sandee is here today to share with us some exciting news!

Hello to all of you wonderful followers of Doodles & Doilies. I am so excited to be here today to introduce to you the Fabulous Friends Scentsy Party in honor of my 50th birthday! Let me tell you how this is going to work; I am so excited! For THIS WEEK ONLY, (thats right you have only ONE week) starting today May 24th, 2011 until May 31st, 2011 with your purchase you can receive

MULTIPLE FREE SCENTSY BARS!!!
So gather your friends together because it is TIME TO PARTY!
The more friends the better!
When you & your friends combine to buy from Doodles and Doilies Party in May!,
here is what you will get

5 Scentsy bars you get 1 FREE!
10 Scentsy bars you get *3 FREE!
20 Scentsy bars you get *6 FREE!
30 Scentsy bars you get *9 FREE!
40 Scentsy bars you get *12 FREE!
so on and so on!
*When ordering your multipack you will order 1 free bar with every 5. Additional free bars will come separately; I will contact you to get your additional free bar(s).


This is just so exciting that I have MORE to offer you in celebration of the Fabulous Friends Party!

Every order of $50 or more will qualify you for a
**BONUS GIVEAWAY!
**$10 value


So let's start shopping!

1. Click here to go to Sandee's Scentsy home page

2. Click buy from party across for Doodles and Doilies Party in May!

3. Scroll down, click combine and save Multi-Pack

4. Click build a muli-pack under Scentsy 6 pack - $25

5. Choose your 6 fragrances (here you will be purchasing 5 and the 6th is free)

6. Click save multi pack & add to shopping cart

7. If you want more FREE BARS than just your 5 Scentsy bars with 1 free bar, click back to shopping

8. Click combine and save multipacks

9. Repeat steps 4-8 as many times as you want to get your FREE SCENTSY BARS!!!

10. Check out is in the top right corner of the page.

HAPPY SHOPPING!!!

Any questions email me at scentedcandles4u (at) yahoo (dot) com or Erica at doodlesanddoilies (at) gmail (dot) com

Blindfold miniature golf

I came across this great date idea...go miniature golfing blindfolded! Here is the trick. Purchase ONE ticket for miniature golfing. Blindfold one person (switch it up if you want). The person who can see helps the blindfolded person golf. Using verbal cues direct the golfer. Be smart, assist them in walking around. Take off the blindfold and walk to the next hole (take turns being the blind golfer if you want).


I hope your date jar is filling up with great inexpensive date ideas!
To see the blog post about the date night jar click here.


If you have more ideas on dates leave a comment. Or email me at doodlesanddoilies (at) gmail (dot) com and I will post it for all to see!

Giveaway!

I know most of you loved the Scentsy giveaway. I found another great opportunity for you to get more Scentsy: ONE full size warmer, ONE plug-in warmer AND SIX
Scentsy bars....yeah that is amazing! Let Life According to Amanda know I sent you (you get 3 additional entries for each person you send over) and then let me know you entered so I can add my additional entries! Check the giveaway out here!

Guest blogger: Paper flower tutorial

I am excited to introduce our guest blogger today.
Kristine is my youngest sister. She is super energetic, fun & spontaneous. She is in love with anything that has a zebra pattern!

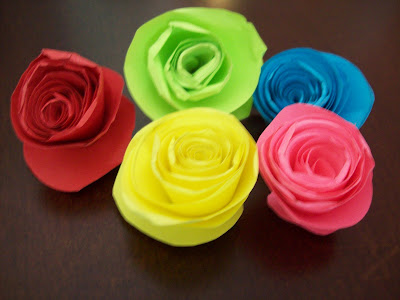
Hi, everyone at Doodles & Doilies, today I will be showing you an easy way to make paper flowers.


Items needed:
Construction paper*double sided, plain, decorative, etc...
Pencil
Scissors
Hot glue gun

The steps are simple:
First, taken any colorful piece of construction paper (preferably) double sided and cut it so it's 4x4.
Next, take a pencil and draw a swirly circle inside the square until you've reached the middle. Make sure you leave enough some space for the base, because the base is the middle in the base of your rose.
Then, cut out the swirl. And make sure you round the very beginning tip. *Shown in the next two pictures.
Now, roll up the swirly thing to make your rose outline. Keep the inside line somewhat at the same line, it will make glueing easier and your rose will turn out better.
Once you have rolled the entire swirl, you then take the base/center and roll it under the rose. Then press your palm on top of the rose against a solid flat surface *this just helps the swirl stay in place.
Last, take your hot glue gun and glue the bottom of the swirl to the base/center.


Thank you show much Kristine for sharing your talent with us. You were right this looks super easy to make! Don't forget to send us pictures of how you use your paper flowers to decorate you home, cards, scrapbook pages, etc.

Friday, May 20, 2011

Crochet: pot holder

Today's topic is brought to you from one of our followers; who suggested that I post a tutorial on how to make a pot holder. So, today we will be making a double thick crocheted pot holder.

You will need:
yarn
crochet hook
scissors
sewing needle

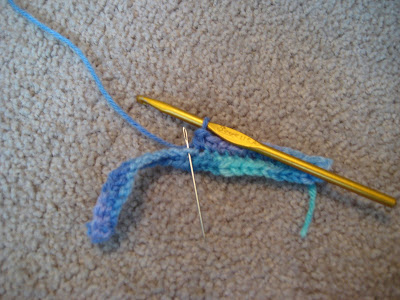
Chain 30 or more depending on how big you want your pot holder.
You will start crocheting in your 3rd stitch (marked by the needle).
Enter the 3rd stitch and pull your yarn through.
Then pull the yarn through the two loops on your hook.
Repeat for the entire chain.
Here is what it will look like when you have reached the end of the chain.
Chain 2 more times in your last stitch.
Don't turn. You will continue crocheting on what was the bottom side of your first chain.
The needle shows you where your stitches will go.
Stitch 1 more time in your last stitch.
Continue to crochet around and around your piece.
The ends will start to turn in.
You are almost done!

Cut your yarn about twice the length of your seam.
This picture shows what loops to go into with your sewing needle...two on the right flap, one in the middle that doesn't show on the front side and one one the left flap.
Sew all the way across.
Here is the top side.
Tie off your yarn. You can cut it or weave the tail into your pot holder.
Here is the bottom side.

Enjoy!

Thursday, May 19, 2011

41 West Designs giveaway!

My friend Brittany is very talented. In fact she is the one who inspired me to start up a blog. So head over to Boerman Ramblings and enter to win a $25 shop credit at Brittany's store 41 West Designs! Good luck!!!

Skin care tips

Some more great information from the building Zion Relief Society meeting!

"SKIN-CARE TIPS
*You should always wash your face and put moisturizer and SPF on every morning. The air is full of pollutants and toxins that all affect your skin. The sun can damage are skin even on an overcast or rainy day. The SPF helps with that. You can often find it your foundation or moisturizers.
*For those of us who have oily skin, any kind of plain yogurt on the whole face for 15 minutes can help.
*For people with dry skin a mask made of a tsp of kelp powder, 1/2 tbs of honey, and 1/2 tbs of aloe vera gel for 15 minutes can help that problem.
*Large pours can be a problem. Making a mask of lemon juice and orange juice and applying it in an upward and outward motion should do the trick.
*Dark circles under the eyes are often a pain. Putting an ice cube on the dark area will tighten and firm it and with a little concealer it should look great!"

What are ideas you've found and/or use?

Wednesday, May 18, 2011

Framed picture board tutorial

My mom and I made this picture board while we visited my family. We had lots of fun and I think it turned out really well!

So, today we will be making a framed picture board so you can show off your favorite pictures!

You will need:
picture frame
batting (crib size)
coordinating fabric (amount depends on your frame), ribbon & beads
scissors
hot glue gun and glue
sewing needles
clear thread

First, you will need to lay out your fabric (the design of your fabric face down) and batting
Place the mat from the picture frame on top of your batting and fabric.
Cut around the matting.
Hot glue the edge of your fabric down to the mat. Make sure that some of the batting is pinched between the mat and fabric.
Trim your fabric.
Here is the front so far:
Now we will be adding ribbon.
Hot glue the beginning of your ribbon to one of the corners.
Stretch it across diagonally to the opposite corner.
Cut your ribbon.
Repeat on your other two corners.
For the center lines:
Glue your ribbon down on the center of on of your sides.
Stretch the ribbon to the next side.
Glue.
Fold ribbon to angle it towards your next side.
Repeat until all of the sides have been done in a counter-clock wise pattern.

Here is what it should look like:
Now you need your needle(s) and clear thread.
Bunch your ribbon together by tying it with the clear thread.
Add your beads.
This is how ours turned out.

Place the finished picture board into your frame.
Hang on your wall.
Add your favorite pictures.

Tell me what you think! And don't forget to send Doodles & Doilies pictures of your projects so we can show off your creativity. Email me at doodlesanddoilies (at) gmail (dot) com.

And the Doodles & Doilies - Party in May! has been extended to the end of the month. So hurry on over to order your favorite Scentsy warmers and fragrances for summer! Check out the warmer of the month: Magellan!
Related Posts Plugin for WordPress, Blogger...